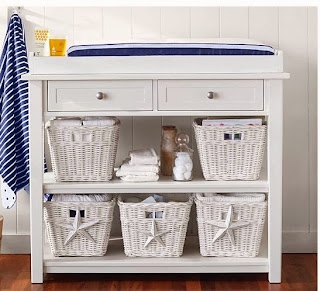
I wanted to build something that would be around for a while, so I decided on a convertible baby changing table. Once she is out of diapers, the top is removable and it becomes a nice little shelving unit.
I was inspired by the Pottery Barn Universal Changing Table which goes for $499 on their website:
Me and my wife really like the quality and look of Pottery Barn baby furniture, but it's tough to swallow dropping that kind of coin on a piece of furniture that you'll use for only a few years. However, we are on the lookout on Craigslist still hopeful that the crib of our dreams will come up gently used. We missed out on one a few weeks ago by 15 minutes!
On to the project...
I was able to find some decent plans and cut sheets on a similar unit (sans drawers) on www.anawhite.com and used those as a guide for what I was going to do.
I made a trip to Lowes to purchase all the materials. The cost for all of the wood was around $80. For the stiles and rails of the outer face frame and pine I chose poplar. For the shelves, I chose some wide pine boards. I am sure that you could build it cheaper, but good luck finding anything more economical at your lumber store that is straight enough to do a decent job. I would recommend in hindsight using plywood for the shelf and top material, rather than wide boards like I did. It's nearly impossible to eliminate cupping or bowing in a board that wide.
On to the instructions
Step #1 - Cutting all the pieces to length on the miter Saw
 |
| I suggest poplar, it's the most economical hardwood that's readily available and easy to work with due to it still being relatively "soft" |
Step #2 - Assemble the side face frames
Step #2 - Attach the shelves and top material to a side face frame
 |
| Bottom shelf attached |
 |
| I utilized pocket holes to not only join the shelves to the face frame, but I also used them to get the width I needed for the shelves out of narrower material. |
 |
| All the shelves attached |
Step #3 - Attach the face frame rails to front and back face of the shelves and top
 |
| Fairly easy to flush up the face frames after shelves installed |
 |
| Add caption |
Step # 4 - Assemble removable changing top
 |
| Important Note - my plans called for the width of the changing pad compartment (large rectangle on left) to be only 15.5" wide, this needs to be 16" to fit the changing pads they sell at Babies R Us |
Step #5 - Attach removable top to base
 |
| TOP - No changing top BOTTOM - Changing top attached |
Step #6 - Trim out the top
Step #7 - Sand Prime and Paint
I used one coat of primer and 2 coats of Sherman Williams High Gloss. I applied it with a Wagner project sprayer with a mini roller and a quality brush to cut in at the joints and fix any over spray.
 |
| Da Vinci, I am not |
 |
| Finished product |
Second - the time. All told, this project took about 8 hours, start to finish. I built this piece in the dead of winter, and struggled to find a day that it was finally warm enough to paint it outside.
Third - the problems. Other than the weather, the top dimensions needed to be bigger to really accommodate most changing pads. Also, using plywood for the shelves would have been much easier and cleaner.
I'll post a picture in the nursery once we get it done!


No comments:
Post a Comment