Wednesday, October 15, 2014

Woodworking - Baby Changing Table

My latest woodworking project is the first for my upcoming little lady who is due in March.

I wanted to build something that would be around for a while, so I decided on a convertible baby changing table. Once she is out of diapers, the top is removable and it becomes a nice little shelving unit.

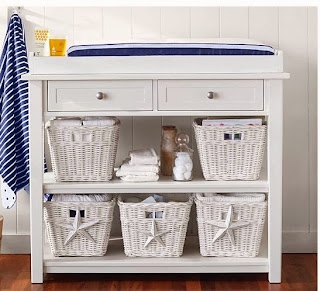
I was inspired by the Pottery Barn Universal Changing Table which goes for $499 on their website:

Me and my wife really like the quality and look of Pottery Barn baby furniture, but it's tough to swallow dropping that kind of coin on a piece of furniture that you'll use for only a few years. However, we are on the lookout on Craigslist still hopeful that the crib of our dreams will come up gently used. We missed out on one a few weeks ago by 15 minutes!

On to the project...

I was able to find some decent plans and cut sheets on a similar unit (sans drawers) on www.anawhite.com and used those as a guide for what I was going to do.

I made a trip to Lowes to purchase all the materials. The cost for all of the wood was around $80. For the stiles and rails of the outer face frame and pine I chose poplar. For the shelves, I chose some wide pine boards. I am sure that you could build it cheaper, but good luck finding anything more economical at your lumber store that is straight enough to do a decent job. I would recommend in hindsight using plywood for the shelf and top material, rather than wide boards like I did. It's nearly impossible to eliminate cupping or bowing in a board that wide.

On to the instructions

Step #1 - Cutting all the pieces to length on the miter Saw
I suggest poplar, it's the most economical hardwood that's readily available and easy to work with due to it still being relatively "soft"


Step #2 - Assemble the side face frames


Step #2 - Attach the shelves and top material to a side face frame
Bottom shelf attached

I utilized pocket holes to not only join the shelves to the face frame, but I also used them to get the width I needed for the shelves out of narrower material.

All the shelves attached
Step #3 - Attach the face frame rails to front and back face of the shelves and top
Fairly easy to flush up the face frames after shelves installed

Add caption
Step # 4 - Assemble removable changing top

Important Note - my plans called for the width of the changing pad compartment (large rectangle on left) to be only 15.5" wide, this needs to be 16" to fit the changing pads they sell at Babies R Us
Step #5 - Attach removable top to base

TOP - No changing top
BOTTOM - Changing top attached


Step #6 - Trim out the top


Step #7 - Sand Prime and Paint
I used one coat of primer and 2 coats of Sherman Williams High Gloss. I applied it with a Wagner project sprayer with a mini roller and a quality brush to cut in at the joints and fix any over spray. 
Da Vinci, I am not
Finished product
Final Verdict: First - the cost. The cost of the wood was about $80, the fasteners were probably about $8, the sand paper was another $5, and the cost of the primer and paint probably added another $10-$20 roughly (I bought $100 worth of paint for several projects). So in one respect it's more than $400 cheaper than buying the Pottery Barn piece.
Second - the time. All told, this project took about 8 hours, start to finish. I built this piece in the dead of winter, and struggled to find a day that it was finally warm enough to paint it outside.
Third - the problems. Other than the weather, the top dimensions needed to be bigger to really accommodate most changing pads. Also, using plywood for the shelves would have been much easier and cleaner.

I'll post a picture in the nursery once we get it done!
Wednesday, August 14, 2013

Woodworking - Building an Entertainment Center with The Kreg Jig

This is the first big project that I will be building with my
Kreg Toolbox Master Collection Model 

Problem: No good place to put the surround sound receiver, subwoofer, Xbox, Blu Ray player, and satellite receiver. We kind of just stuck it in the corner and hoped that it wouldn't fall down and  with a little house guest on the way, I wanted to come up with a more permanent, and safe solution to storing all of our living room electronics. 

Solution: I took the free book shelf plans from www.kregtool.com and modified them to make a custom built entertainment center for the living room. 

Step 1 - Build a face frame
I used 1x poplar for the face frame


Step 2 - Build 1 side and attach to the face frame
I used 3/4" oak veneer plywood for the sides
Step 3 - Build 3 shelves and attach to face frame and one side

Step 4 - Attach other side piece to shelves and face frame


Step 5 - Attach the top and it's all over but the shouting
Now I just have to pick what finish I want to put on it...can you say floor stain?

Woodworking - Hardwood Floor Refinishing Project

The first project I started was the kitchen cabinets, which is still in progress and I'll blog on later. The second project was the hardwood floor refinishing. The steps involved with this project take about a week per room start to finish.

Step 1 - Remove all furniture from the room
You are left with a distressed floor and a happy hound Lucy
Pretty evident that this floor needed redone
Step 2 - Rent a drum sander and edge sander. I used Arts Rental, everyone else had them all rented out

Step 3 - Use the large drum sander to sand the "field" and the edge sander on the perimeter. It took me several passes with the drum sander to get it all the way down to wood. 

Step 4 - Switch to a finer grit sand paper to smooth out the rough sanding. Again, took me a few passes to smooth it out.

Step 5 - Once you have it sanded to a smooth face, take your time getting it swept and cleaned up, I used tack cloth to do a final wipe down.


Step 6 - Apply pre-stain wood conditioner to the now bare wood floor.


Hard to tell in this picture, but the pre-stain makes the wood appear damp. It's meant to prevent blotchiness and even the stain's penetration.
Step 7 - Apply first coat of stain. I used a Wooster 2" synthetic brush to apply with the grain of each board. Then let it set for a few minutes and take a rag to wipe up whatever hasn't soaked into the wood, again wipe with grain of the wood to avoid streaking.
Step 8 - Apply second coat of stain. We decided that we wanted a darker finish after the first coat had dried so we applied a second coat, repeating the process of step 7.

Difference between 1 coat and 2 coats of stain

Difference between unstained and 2 coats of stain

Step 9 - After the stain is no longer tacky, you can apply the first coat of Polyurethane. The poly that I chose only takes 2 coats for maximum protection.

Step 10 - After the polyurethane has had an opportunity to dry, at least a day, you can do a light sanding with 120 grit sand paper and I used an orbital sander. After you carefully clean up all the dust, you can apply the second coat.

 Step 11 - Depending on conditions, 72 hours (or more) later you're done! Unfortunately for me, I'm only 1/2 way done. Now I have to move all the furniture from the living room to the dining room and do it all over again in the other room. Here are some pics of the finished dining room.


Thursday, July 25, 2013

Triathlon Done

Blog Post for June

Spectacular achievement is always preceded by unspectacular preparation.
Robert H. Schuller 

I achieved greatness...kind of

I finished the Little Miami Triathlon last weekend along with my buddy Rob

We did it in just over 3 hours 11 minutes.

I kind of ran out of gas on the bike and Rob could have took off and probably beat me by 5 minutes but he stuck back with me and we finished together.

Team - BRAUNEN HUNDEN

Finish Position - 53

Team Score (times): 6:22:34.15

Team Pos
Bib No
Name City/State
O'all Place
Cum. Place
Time
Cum. Time
1
3147
JAKE FROMHOLT DAYTON, OH
104
104
3:11:16.48
3:11:16.48
2
3146
ROB EMMERICH ,
105
209
3:11:17.67
6:22:34.15


Rankings
#53 out of 90 teams in the male/male team division
#283 and 284 out of 762 in the non-kayak division
#318 and 319 out of 852 overall

Monday, June 10, 2013

Top Gun 3D and Capt. Hoot Gibson

Editor's note - we did this in April and I forgot to post...
 
I feel the need...the need for speed
-Goose and Maverick

I scored some major brownie points with the wife last night. To wrap up a pretty nice weekend, we went and saw one of her all time favorite movies, Top Gun, in 3D at the newly renovated theatre at the National Museum of the United States Air Force (always amazed that something so cool is so close to home). It was the final show of the three day eventcalled the Reel Stuff Film Festival of Avation.

I have to admit that the movie was pretty awesome. I haven't seen it since I was a little guy. Although, I still can't seem to get over how crazy Tom Cruise is, and I could do without the whole jaded love storyline between Cruise and Kelly McGillis. Despite those set backs, the dogfight sequences were pretty spectacular with the 3D effect and the audio was amazing. I'm sure that if Tony Scott were alive, he'd want everyone to have seen his iconic film in it's fully remastered and enhanced format.

However, the movie was far from the highlight of my night. Before and after the movie, we were treated to an in person interview with a real American hero. Along with the man who developed the technology to allow the 3D conversion, Captain Robert 'Hoot' Gibson was an invited guest and presenter. He talked about what it was like to go to the real Top Gun school and what in the movie was realistic, and what was totally made up. Not surprisingly, buzzing the tower would probably get you grounded forever.

What an impressive guy:
  • 50+ combat missions in Vietnam
  • 5 Shuttle Missions
  • 4 time mission commander of the shuttle
  • 37 days in space
  • Countless citations for military service
  • Experience flying over 100 different aircraft
Events like this make me appreciate how Dayton can rock from time to time.

Friday, April 12, 2013

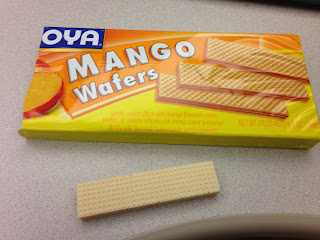
Goya Mango Wafers

"A balanced diet is a cookie in each hand" - Unknown
 

I discovered what might the best damn cookie in existence last night. I was shopping at my favorite grocery store, Dorthy Lane Market, after going to the gym.

A little tip from Uncle Jake: Never go to the grocery before you have had dinner (especially after you work out and haven't had dinner) as pretty much everything looks awesome and you will end up with a bunch of crap in your cart.

On the way to the register, already with a shopping basket full of crap that I shouldn't be eating, I made another total impulse buy and picked up some of the Goya brand Mango Wafers.

Turns out that this is a cookie company from Brazil. The whole pack is only $1.00 and includes what I would estimate to be around 30 cookies. When I opened the pack after dinner to have a few for dessert, I uncovered the joy that is this cookie.

Thursday, April 11, 2013

Straight Razor Shaves

"Wisdom is in the head and not in the beard" - Swedish Proverb
 
I'll Get To The Point: If you haven't had a professional shave,  go get one!
 
I took the leap and decided to shave the beard off for the spring. I grew it back in October and kept it in varying degrees of lumberjack-ness ever since, but the weather is getting warmer and it's time to freshen up. Here's the before:
The Before
Rather than go the traditional route and just simply take a crappy disposable razor to my mug, I decided it was a perfect opportunity to cross something off my bucketlist and go get a professional shave. I went to the Mariemont Barber Shop , an old school barber shop over in the quaint Eastside neighborhood Mariemont.
 
After an hour of trimming, hot towels, oils, lather, and a straight razor in the capable hands of my barber, Lucky, I am very happy with the results. It was $30+tip for a full haircut and shave, and like I said it takes about an hour, but it's money and time well spent. There have been few lunch breaks that have been as enjoyable.
The After
I think that my next purchase will be a home shaving kit from a store I heard about at the Kenwood Mall, The Art of Shaving.